If you like this post, help us share it

How do I shoot better under low light? What are the techniques involved?
Three simple steps really:
-
Choose your metering mode wisely,
-
Watch your shutter speed and ISO, and
-
Correct focus under low light.
When it comes to shooting indoor, typically you need to shoot above ISO 800+ to give you a reasonable shutter speed (see below).
Consider the below Exposure Value (EV) Chart, notice that typical indoor lighting has an EV of 6 – 7. Outdoor lighting conditions start from EV 9, where EV 10 is the lighting condition during sunset and EV 15 being on a bright daylight.
| Exposure Value Chart | |
|
EV
|
TYPE OF LIGHTING SITUATION |
|
-6
|
Night, away from city lights, subject under starlight only. |
|
-5
|
Night, away from city lights, subject under crescent moon. |
|
-4
|
Night, away from city lights, subject under half moon. Meteors (during showers, with time exposure). |
|
-3
|
Night, away from city lights, subject under full moon. |
|
-2
|
Night, away from city lights, snowscape under full moon. |
|
-1
|
Subjects lit by dim ambient artificial light. |
|
0
|
Subjects lit by dim ambient artificial light. |
|
1
|
Distant view of lighted skyline. |
|
2
|
Lightning (with time exposure). Total eclipse of moon. |
|
3
|
Fireworks (with time exposure). |
|
4
|
Candle lit close-ups. Christmas lights, floodlit buildings, fountains, and monuments. Subjects under bright street lamps. |
|
5
|
Night home interiors, average light. School or church auditoriums. Subjects lit by campfires or bonfires. |
|
6
|
Brightly lit home interiors at night. Fairs, amusement parks. |
|
7
|
Bottom of rainforest canopy. Brightly lighted nighttime streets. Indoor sports. Stage shows, circuses. |
|
8
|
Las Vegas or Times Square at night. Store windows. Campfires, bonfires, burning buildings. Ice shows, football, baseball etc. at night. Interiors with bright florescent lights. |
|
9
|
Landscapes, city skylines 10 minutes after sunset. Neon lights, spotlighted subjects. |
|
10
|
Landscapes and skylines immediately after sunset. Crescent moon (long lens). |
|
11
|
Sunsets. Subjects in open shade. |
|
12
|
Half moon (long lens). Subject in heavy overcast. |
|
13
|
Gibbous moon (long lens). Subjects in cloudy-bright light (no shadows). |
|
14
|
Full moon (long lens). Subjects in weak, hazy sun. |
|
15
|
Subjects in bright or hazy sun (Sunny f/16 rule). |
|
16
|
Subjects in bright daylight on sand or snow. |
|
17
|
Rarely encountered in nature. Some man made lighting. |
|
18
|
Rarely encountered in nature. Some man made lighting. |
|
19
|
Rarely encountered in nature. Some man made lighting. |
|
20
|
Rarely encountered in nature. Some man made lighting. |
|
21
|
Rarely encountered in nature. Some man made lighting. |
|
22
|
Extremely bright. Rarely encountered in nature. |
|
23
|
Extremely bright. Rarely encountered in nature. |
Once you have a bit of understanding on the different EV lighting condition, you can use the second chart below to find out how your camera behalves based on the EV of the scene. For example: an EV of 6 (typical indoor lighting), the suggested camera setting is 1/8s @ f/2.8, 1/4s @ f/4 or equivalent.
The suggested shutter speed is of cause too slow, in which case you need to raise your ISO until you get a reasonable shutter speed (say 1/60s). To get to a reasonable shutter speed say 1/60s, there is a 3 stops difference (count 3 squares down to get from 1/8s to 1/60s), so the ISO needs to increase by 3 stops to ISO 800 (100->200->400->800).

However, when you use a slower lens like f/4, then you will need to use an even higher ISO (1600) or slower shutter speed (1/30s). Typically, ISO 800 is the lowest ISO required to shoot indoor hand held.
In an even lower lighting condition, like in a dimly lit restaurant, you will need to use a very high ISO and/or a very slow shutter speed. This is where your fast lenses and Full Frame camera (FX) pay off :D. Ultimately, the setting for shooting under low light condition is a compromise between
-
the highest ISO you are willing to accept,
-
your slowest hand held shutter speed w/o camera shake, and
-
the largest aperture you want to use
Different metering modes (spot, center-weighted and matrix) can also affect the camera settings since it changes the way the camera determines the exposure (EV). I won’t go over them here, but they are well explained in Metering Mode – Wiki.
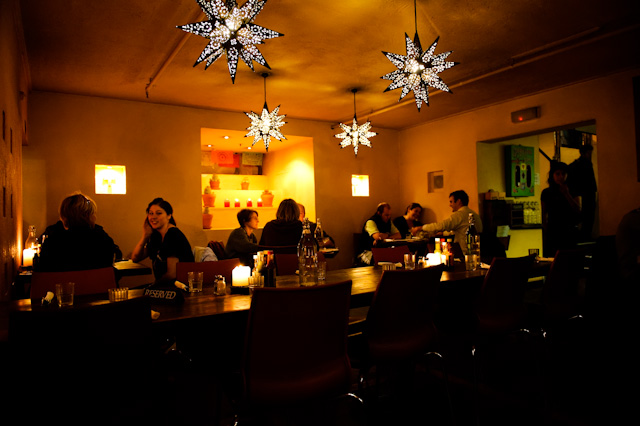
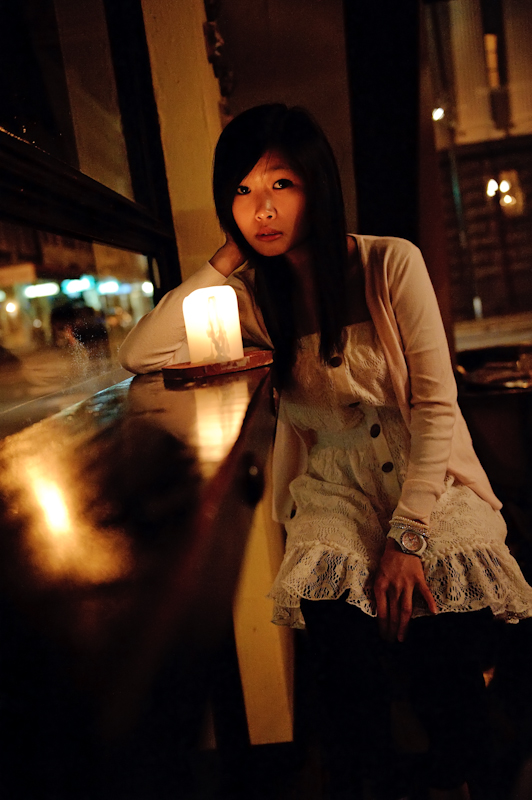
Here are some images taken recently at a candle lit restaurant
Camera: Nikon D700
Lens: Nikon 24-70mm f/2.8
Spot metering

Matrix metering, ISO 3200, f/2.8
Center-weighted metering, ISO 1600, f.2,8
Matrix metering, ISO 3200, f/2.8
Hi Kent,
Great info, but what was the exposure times in those photos?
Thanks.
I was shooting hand held, so I would say no longer than 1/20s
That's very correct Liam, thanks for added it to the list.
Great info, all I would add is a custon white balance may help when shooting with mixed lighting sources.
http://www.pixs.co.nz